忘れそうなので手順をメモしておきます。
TWA化した私のアプリ
参考までに、私の場合は以下のNext.jsアプリを👇
Pair Matcher | バドミントンやテニスでペア分けできるアプリ
以下のようにAndroidアプリとしてGoogle Playに公開しました👇
Pair Matcher | バドミントンやテニスでペア分けできるアプリ- Google Play のアプリ
やるべきこと
Next.jsでPWA化
next-pwaを使えば、超簡単にPWA化できます。
以下ページの手順どおりに行うだけです👇
https://github.com/shadowwalker/next-pwa
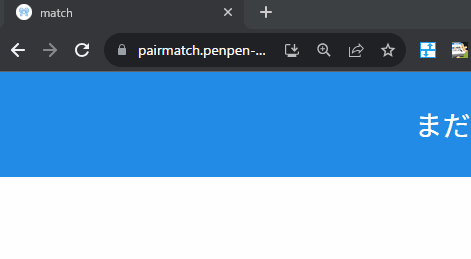
▲PWA化に成功すると、ブラウザのURLバーからインストールボタンが表示されるようになります。
bubblewrapでTWA化
PWA化に成功したら、次はTWA化します。
TWA化には、bubblewrapというCLIツールを使います。
以下で、bubblewrapでTWA化のウィザードを開始できます👇
npm i -g @bubblewrap/cliでインストールbubblewrap init --manifest https://◯◯.com/manifest.jsonでウィザードを開始https://◯◯.com/manifest.jsonの部分は、next-pwaで作成したmanifest.jsonを指定します。
以下、ウィザードの内容です👇
$ bubblewrap init --manifest https://pairmatch.penpen-dev.com/manifest.json
,-----.        ,--.  ,--.  ,--.
|  |) /_,--.,--|  |-.|  |-.|  |,---.,--.   ,--,--.--.,--,--.,---.
|  .-.  |  ||  | .-. | .-. |  | .-. |  |.'.|  |  .--' ,-.  | .-. |
|  '--' '  ''  | `-' | `-' |  \   --|   .'.   |  |  \ '-'  | '-' '
`------' `----' `---' `---'`--'`----'--'   '--`--'   `--`--|  |-'
                                                           `--'
Initializing application from Web Manifest:
        -  https://pairmatch.penpen-dev.com/manifest.json
WARNING: Trusted Web Activities are currently incompatible with applications
targeting children under the age of 13. Check out the Play for Families
policies to learn more.
https://play.google.com/console/about/families/

Web app details (1/5)

The application generated by Bubblewrap will open a Progressive Web App when
started from the Android launcher. Please enter the following details about
the PWA:

        - Domain: the domain / origin where the PWA is hosted.
          Example: example.com

        - URL path: an URL path relative to the root of the origin,
          opened when the application is started from the home screen.
          Examples:

                - To open https://example.com/: /
                - To open https://example.com/path-to-pwa/: /path-to-pwa/

? Domain: pairmatch.penpen-dev.com
? URL path: /

Android app details (2/5)

Please, enter details regarding how the Android app will look when installed
into a device:

        - Application name: the name used in most places,
          including the App information screen and on the Play Store.

        - Short name: an alternate name for the app, limited to
          12 characters, used on a device launch screen.

        - Application ID: also known as Package Name, this is
          the unique identifier for the application on an Android device or
          the Play Store. The name must contain at least two segments,
          separated by dots, each segment must start with a letter and all
          characters must be alphanumeric or an underscore (_).

        - Display mode: how the app will be displayed on the
          device screen when started. The default mode, used by most apps,
          is standalone. fullscreen causes the device status bar and
          navigation bars to be removed and is suitable for games or media
          players. For more information on the status bars and navigation
          bar on Android, go to:
           - https://material.io/design/platform-guidance/android-bars.html.

        - Status bar color: sets the status bar color used when the
          application is in foreground. Example: #7CC0FF

? Application name: Pair Matcher
? Short name: Pair Matcher
? Application ID: com.penpen_dev.pairmatch.twa
? Starting version code for the new app version: 3
? Display mode: fullscreen
? Orientation: any
? Status bar color: #1C7ED6

Launcher icons and splash screen (3/5)

The Android app requires an image for the launcher icon. It also displays a
splash screen while the web content is loading, to avoid displaying a flash of
a blank white page to users.

        - Splash screen color: sets the background colour used for the
          splash screen. Example: #7CC0FF

        - Icon URL: URL to an image that is at least 512x512px. Used to
          generate the launcher icon for the application and the image for
          the splash screen.

        - Maskable Icon URL (Optional): URL to an image that is at least
          512x512px to be used when generating maskable icons. Maskable
          icons should look good when their edges are removed by an icon
          mask. They will be used to display adaptive launcher icons on the
          Android home screen.

? Splash screen color: #ffffff
? Icon URL: https://pairmatch.penpen-dev.com/android-chrome-512x512.png
? Maskable icon URL:

Optional Features (4/5)

        - Include app shortcuts: This question is only prompted if a
          'shortcuts' section is available on the input Web Manifest. When
          answered “yes”, Bubblewrap uses the information to generate
          shortcuts on the Android app. Read more about app shortcuts at
          https://web.dev/app-shortcuts/.

        - Monochrome icon URL: URL to an image that is at least 48x48px to
          be used when generating monochrome icons. Monochrome icons should
          look good when displayed with a single color, the PWA's
          theme_color. They will be used for notification icons.

? Monochrome icon URL:
? Include support for Play Billing (this relies on alpha dependencies)? No
? Request geolocation permission? No

Signing key information (5/5)

Please, enter information about the key store containing the keys that will be used
to sign the application. If a key store does not exist on the provided path,
Bubblewrap will prompt for the creation of a new keystore.

        - Key store location: The location of the key store in the file
          system.

        - Key name: The alias used on the key.

Read more about Android signing keys at:
         https://developer.android.com/studio/publish/app-signing

? Key store location: /home/penpen/pair.jks
※自分の場合、以前JavaでAndroidアプリをつくって、GooglePlayに登録したことがありました。
なのでそのときに作った.jksファイルを指定しました。
作成したことがない場合はここをスキップすれば自動的に作成してくれるみたいです

? Key name: key0
※ここも同じ。キーストアの中のどのキーを使用するか指定します。
基本的にmanifest.jsonの値を自動で読み取ってくれるので、Enterを押して行くだけで完成しますが
個人的に注意すべき設定ポイントは以下でした👇
- Splash screen color: #ffffff
- アプリを起動したときに最初に表示されるアプリアイコン+背景色で表示される画面のことをSplash screenと呼ぶらしいです。
- ここの画面で、アイコンと相性の良い色を選ばないとダサくなります。
▲青色のアイコンと白背景の画面が一瞬表示されますが、そこの背景色のことです
最後にbubblewrap buildを実行します👇
$ bubblewrap build
,-----.        ,--.  ,--.  ,--.
|  |) /_,--.,--|  |-.|  |-.|  |,---.,--.   ,--,--.--.,--,--.,---.
|  .-.  |  ||  | .-. | .-. |  | .-. |  |.'.|  |  .--' ,-.  | .-. |
|  '--' '  ''  | `-' | `-' |  \   --|   .'.   |  |  \ '-'  | '-' '
`------' `----' `---' `---'`--'`----'--'   '--`--'   `--`--|  |-'
                                                           `--'
Please, enter passwords for the keystore /home/penpen/pair.jks and alias key0.

? Password for the Key Store: ********
? Password for the Key: ********

Building the Android App...
        - Generated Android APK at ./app-release-signed.apk
        - Generated Android App Bundle at ./app-release-bundle.aab
jksファイルのキーを開くためのパスワードを求められるので入力します。
これで、apkファイルやaabファイルが作成されます👇
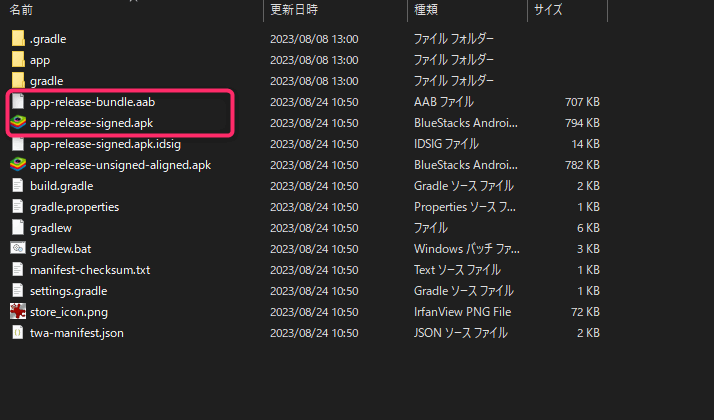
▲app-release.signed.apkをDropboxなどにアップロードして、スマホからダウンロードして実行すると、手動でインストールできます。
aabファイルは、のちほどGoogle Playにアップロードするのに使います。
.well-known/assetlinks.jsonを作成
次にウェブサイトの/.well-known/assetlinks.jsonを作成します。
これを設置することで、「このAndroidアプリとNext.jsアプリはお互いに同一人物が作ったアプリなんだね」を証明できます。
これを設置しないと、「TWAアプリの中で内部ブラウザが立ち上がる」みたいな形になってしまいます👇(上部にメニューが表示されちゃう)。
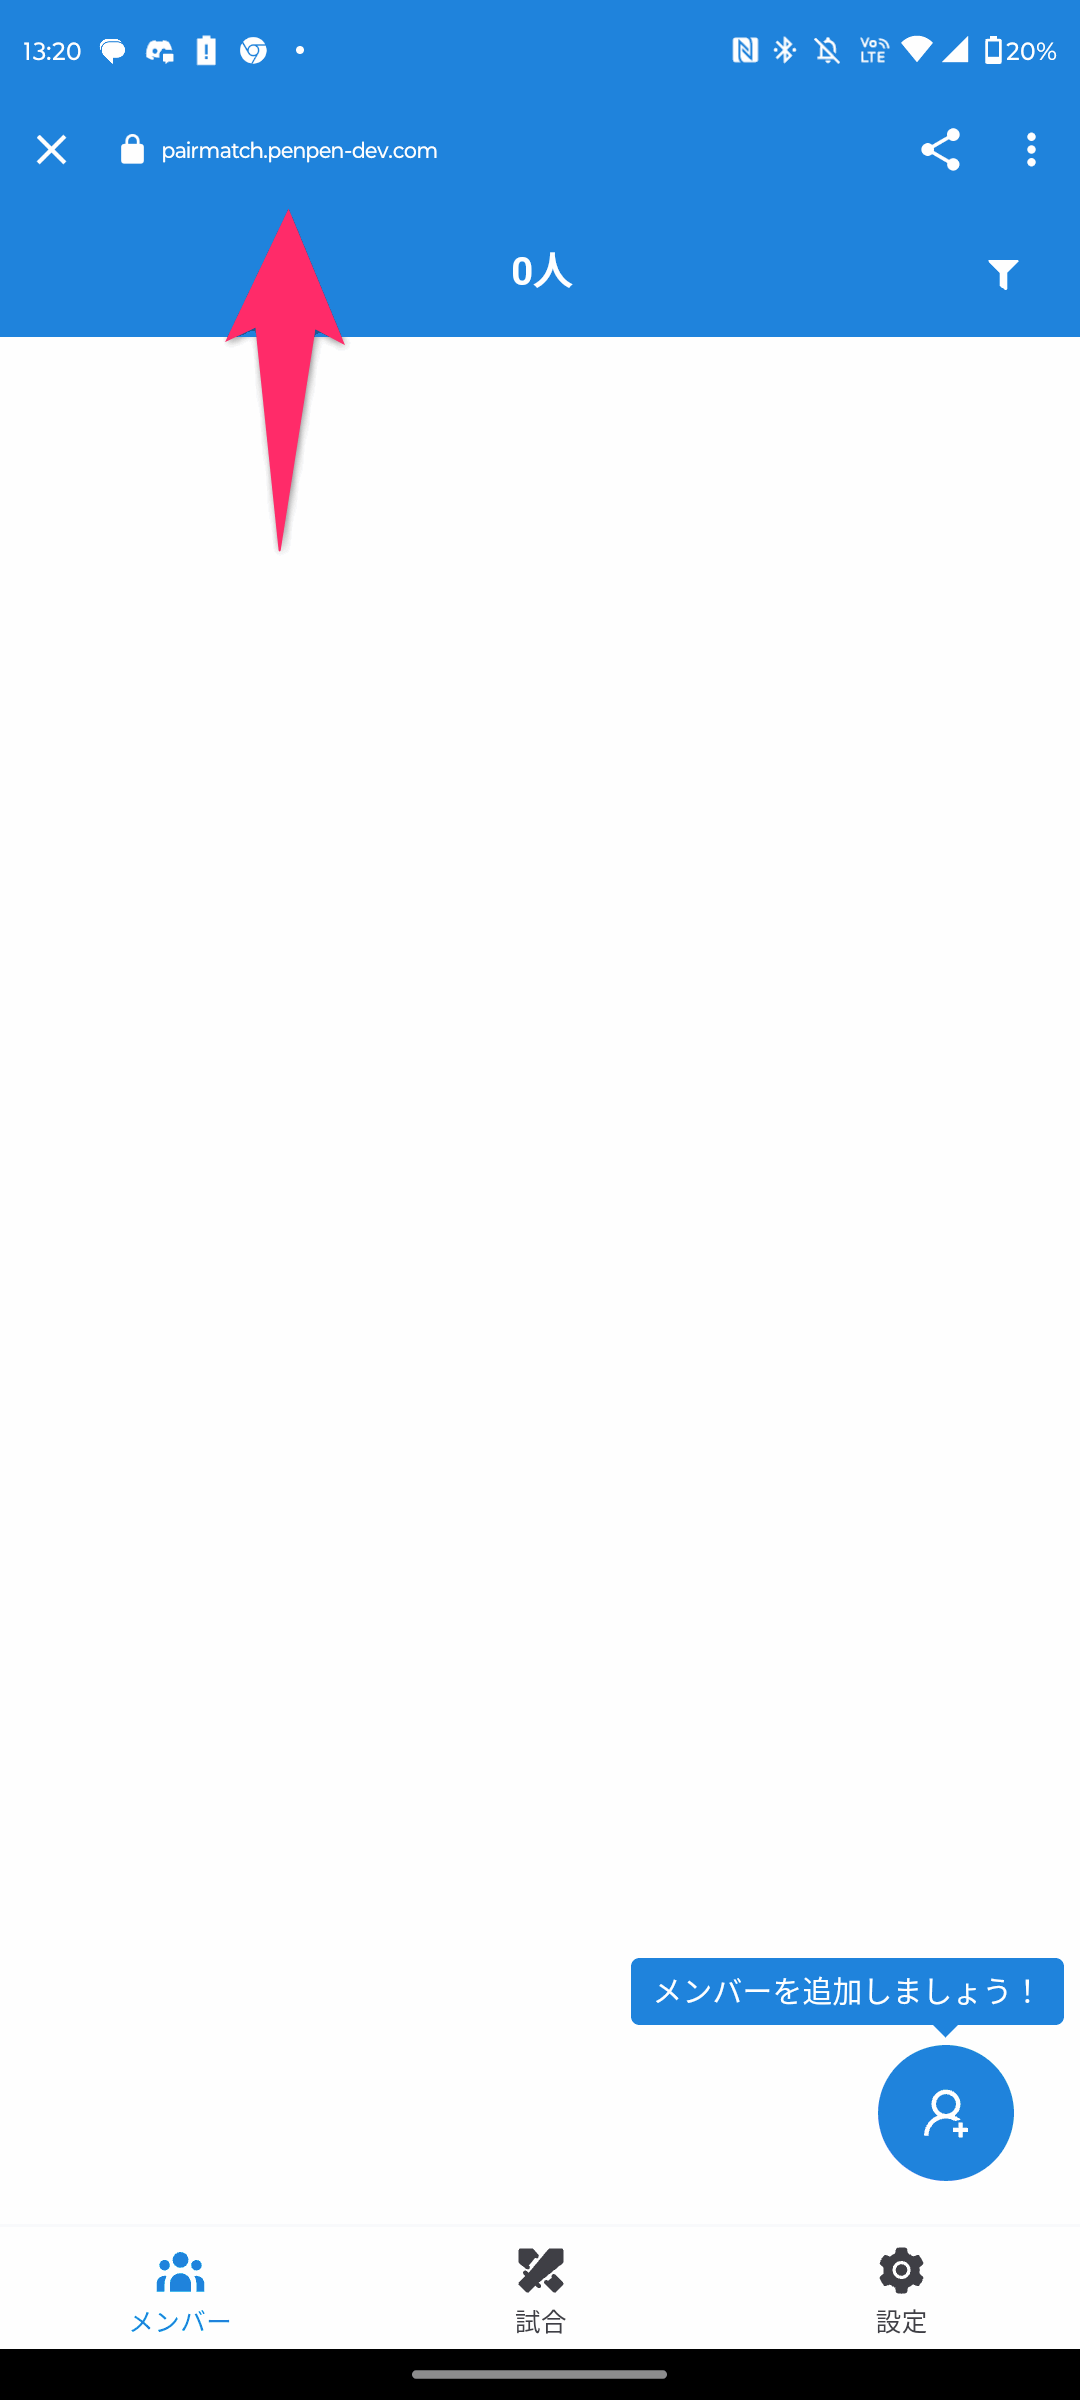
▲たぶん設置していない場合は「他者のサイトを表示してる」みたいな扱いになるので、「このアプリはこのサイトとは関係ありませんよ」感を出すためにブラウザ(Webviewと呼ぶらしい)で立ち上げてるのかも。
たとえば、私が個人開発しているTWAアプリだと、以下のようなファイル内容になります。
https://pairmatch.penpen-dev.com/.well-known/assetlinks.json
このファイルの中身は、Play Consoleの中の「設定」→「アプリの署名」の中に、Digital Asset Links JSONという項目があるので、この中身を丸々コピペするだけです👇
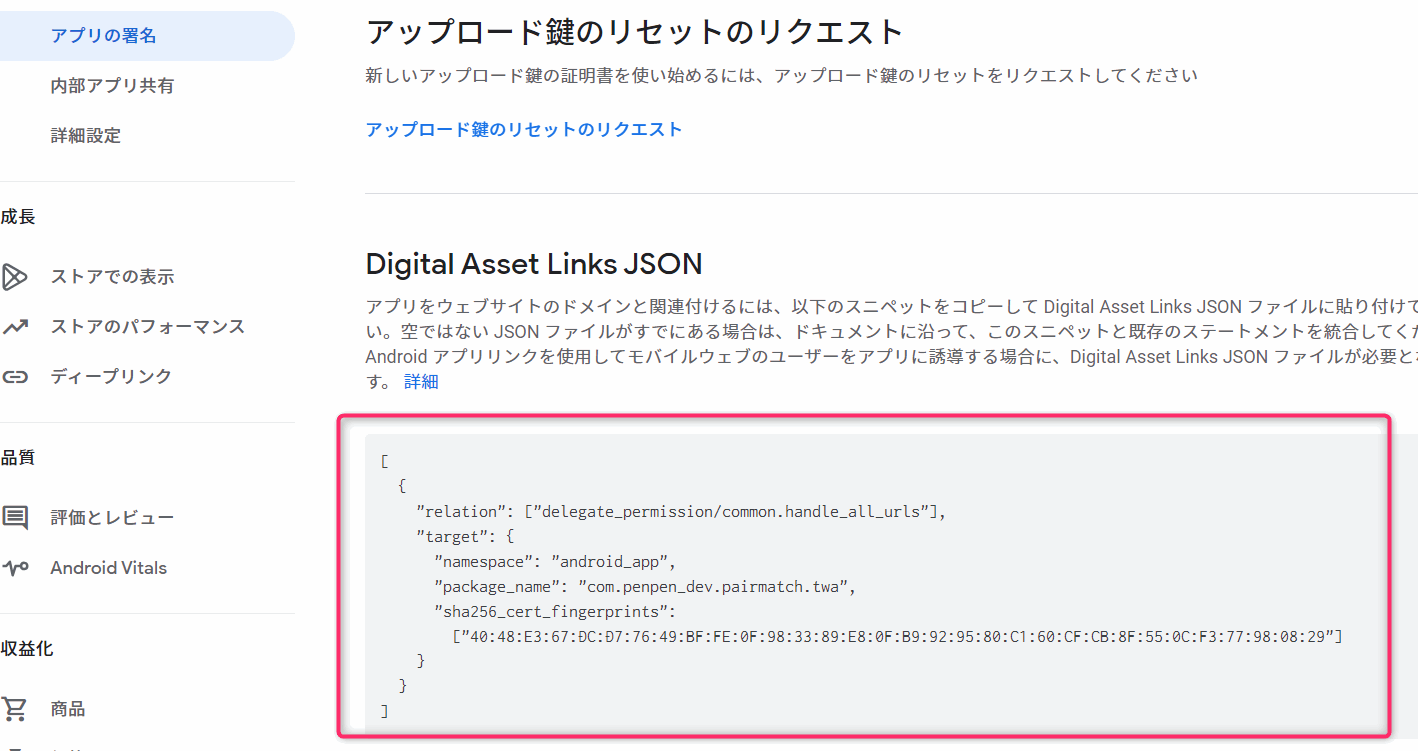
Next.jsの場合は、public/.well-known/assetlinks.jsonに設置すれば良いはずです。
Google Playにアップロード
初回の場合は、Googleにお布施として25ドル払ったり、いろいろすることがあると思います。
それらが終わったら、「新しいリリースを作成」みたいなボタンを押して、いろいろな項目を埋めていきます。
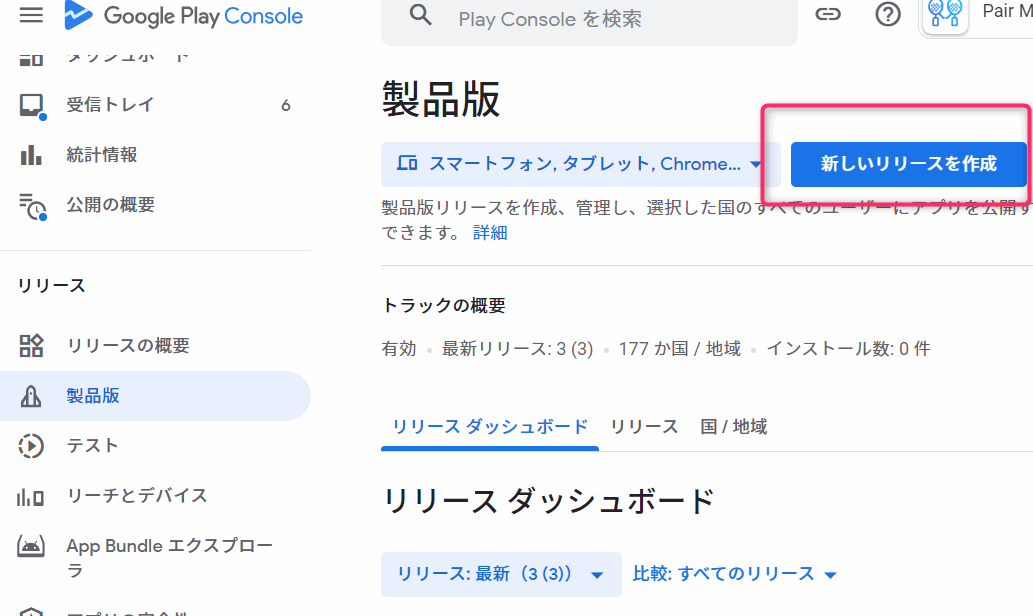
それらが全部おわったら審査に出す→審査が終わったら無事公開!みたいな流れです。
ここらへんの流れについては、ググれば大量に情報があると思うのでそちらに譲りたいと思います。
おわり
コメント